Last night was the Top Producer Awards Ceremony! I was so proud and humbled to be awarded with my colleagues as one of the top 10 Napa County Agents of 2018! It was a truly inspiring event because sometimes Real Estate is not easy, but we work every day to overcome the challenges and help others to do the same and that is what really matters!
The Most Common Spring Cleaning Mistake (Plus 8 Others)

Once there’s even a glimmer of spring, you’re ready to throw open your windows and let the breeze blow away the winter funk. Well, you might want to rethink that spring cleaning ritual this year.
If you’re an allergy sufferer (and who isn’t?), that’s the last thing you want to do, says Dr. Neeta Ogden, a spokesperson for the American College of Allergy, Asthma and Immunology. “It will allow pollen to settle in your home.”
If you really can’t skip that spring breeze, avoid opening them in the morning, pollen counts are highest in the morning; they decrease late in the day and at night.
And that’s not the only common spring-cleaning mistake homeowners make. Here are eight more to avoid:
#1 Not Looking Up
You’ve worked up a sweat and everything’s starting to sparkle, but then you realize your ceiling fan is coated in dust. Uh, oh. Once you start wiping the fan, dust will scatter on what you’ve already cleaned. That’s why you should always look up to see what needs dusting before you start cleaning at eye level. Tackle hard-to-reach places like the tops of bookshelves, crown molding, and window ledges.
#2 Starting to Clean Without a Plan
You wake up motivated — today you’re going to get all your spring cleaning done! But by noon, your house is in disarray, and not one single room is finished. Ugh. That’s why Briana Norde, owner of Caliber Cleaning Inc. says it pays to break up the biggest cleaning project of the year into smaller, more manageable tasks.
She recommends conquering your hardest job first, like the kitchen, which she calls the “most time-consuming room.” With that first accomplishment under your belt, you’ll have the momentum to take on the remaining tasks. The key is to give yourself plenty of breaks. And there’s nothing wrong with spreading it out over several days.
#3 Ignoring That Weird-Looking Vacuum Attachment
Don’t let your carpet hog the vacuum. The crevice tool, Norde says, “is not used nearly enough.” Use it between your wall and refrigerator to get out the accumulated dust that’s otherwise unreachable, and run it around the edge of your baseboards to clean where standard upright vacuums can’t reach.
#4 Skipping the Mattress
Think of how much time you spend in your bed. Yet, you probably clean the top of your fridge more often than your mattress. Your mattress harbors millions of dust mites, which cause various respiratory conditions including sneezing, a runny nose, itchy eyes, and skin rashes (not to mention just being plain gross).
“[Dust mites’] food is human skin scales, so the bed is just heaven for them,” says Ogden.
She recommends using a vapor steam cleaner to root out the itchy devils, then wrapping it in an anti-allergen mattress protector.
At the very least, sprinkle your mattress with baking soda and let it sit for awhile. Then (using the attachment mentioned above) vacuum it up.
#5 Relying on Harsh Cleaners
There’s a reason many commercial cleaners have the words ”danger,” “hazard,” or “caution,” on their labels. Something in the ingredients is toxic in one form or another, and most all could aggravate allergies and asthma. So, “don’t go crazy with cleaners you don’t need,” says Ogden. Moldy bathrooms may scream for bleach, but most surfaces do not. Ogden recommends making your own solution of water and vinegar (use a fifty-fifty ratio), which will keep most surfaces clean and germ-free.
#6 Using Chemical Air Fresheners
You want your home to smell fresh, so it’s tempting to reach for that mountain-rain-spring-fresh-scent in a can. But aerosol air fresheners contain high levels of toxic pollutants like phthalates, which can affect hormone levels, cause reproductive abnormalities, and increase allergies and asthma. Yikes. Try homemade (and less-expensive) alternatives, such as potpourri, or essential oils and water in a spray bottle.
#7 Leaving the Clutter
All of the spring cleaning tips and advice are useless if you don’t declutter first.
“We tend to not clean well around clutter,” says Ogden. “You’re not going to reach the dust there.”
Make sure toys are put away, books are back on the bookshelf, and paperwork is filed before you begin the cleaning process. Otherwise, you’re leaving room for dust and pollen to hide — making spring cleaning all for naught.
#8 Treating It Like a Chore
If you dread spring cleaning, this should make you feel better: a Harvard study found those who treated cleaning as beneficial exercise saw a decrease in weight, body mass index, blood pressure, and more. That’s what we call a trifecta: living in a clean home, breathing allergy-free air, and feeling great!
Article from HouseLogic.com

Home-Selling Checklist: 12 Things to Do Before Selling Your House
Getting ready to sell your house? Then it’s time to roll up your sleeves and get to work! Selling a home, after all, entails a whole lot more than just planting a “For Sale” sign on your front lawn or uploading a few random photos of your place—especially if you’re angling for the most cash. (And, honestly, who isn’t?)
So before you put your house on the market, peruse this checklist of things you must do in preparation. Some of these tips are surprisingly easy, while others might require a bit more elbow grease. But they’re bound to pay off once buyers start oohing and ahhing over your place—and hopefully ponying up a great offer.

1. Find a great real estate agent
Think you can sell your home yourself, and pocket the cash you would otherwise pay an agent? It can be tempting, especially in a hot market, but resist the urge, says Jon Sterling, a real estate consultant with Keller Williams Realty in San Francisco. He’s found that a “For Sale by Owner” transaction is almost always a disaster, leading you to sacrifice both money and time.
That said, don’t just blindly hire the agent who most recently sent you a flier or the one your uncle’s friend’s co-worker’s cousin used. Do some research to find a real estate agent (or ideally a few) who is knowledgeable about your specific market, and then interview her to make sure she’s a good fit.
2. Consider your curb appeal
Make sure the first thing prospective buyers see of your home entices them to want to see more. Yes, for better or worse, buyers do tend to judge a book by its cover. By investing some effort in relatively easy fixes like planting colorful flowers and repainting your front door, the outside of your house can beckon them to come on in.
3. Declutter living areas
Less is definitely more when it comes to getting your house ready to show, notes Boris Sharapan Fabrikant, a real estate broker with Triplemint.
Do a clean sweep of counters, windowsills, tables, and all other visible areas, and then tackle behind closed doors: closets, drawers, and cupboards—since virtually nothing is off-limits for curious buyers. And if the house is overflowing with stuff, they might worry that the house won’t have ample space for their own belongings.
Take the excess and donate or pack it up for a storage space. The bonus to taking care of this now is that it’s one less chore you’ll have to do when it’s actually time to move.
4. Depersonalize your space
The next step on your declutter list? You want to remove any distractions so the buyers can visualize themselves and their family living in the property, says Kipton Cronkite, a real estate agent with Douglas Elliman in New York.
He says that includes personal items and family photos, as well as bold artwork and furniture that might make your home less appealing to the general public. The goal is to create a blank canvas on which house hunters can project their own visions of living there, and loving it.
5. Repaint walls to neutral tones
You might love that orange accent wall, but if it’s your potential buyer’s least favorite color, that could be a turnoff, warns Sharapan Fabrikant.
“You’re pretty safe with a neutral color because it’s rare that someone hates it, but the other benefit is that a light color allows [buyers] to envision what the walls would look like with the color of their choice,” he points out.
6. Touch up any scuff marks
Even if you’re not doing a full-on repainting project, pay special attention to scrubbing and then touching up baseboards, walls, and doors to make the house sparkle and look cared-for.
7. Fix any loose handles
A small thing, sure, but you’d be surprised by the negative effect a loose handle or missing lightbulb can have on a buyer, notes Sharapan Fabrikant. “It can make them stop and think, ‘What else is broken here?’”
8. Add some plants
Green is good, because plants create a more welcoming environment. You might also want to consider a bouquet of flowers or bowl of fruit on the kitchen counter or dining table.
9. Conduct a smell test
Foul odors, even slight ones, can be a deal breaker, and the problem is that you might not even notice them, says Sharapan Fabrikant. He recommends inviting an unbiased third party in to try to detect any pet smells or lingering odors from your kitchen.
If the smells are pervasive, you might need to do some deep cleaning, because many buyers are on to your “masking techniques” such as candles or plug-in room deodorizers.
10. Clean, clean, clean
And then clean some more. You want your property to look spotless. Take special care with the bathroom, making sure the tile, counters, shower, and floors shine.
11. Hide valuables
From art to jewelry, make sure that your treasures are out of sight, either locked up or stored offsite, recommends Kronkite.
12. Consider staging
Does your house scream 1985? Nothing invigorates a house like some new furnishings or even just a perfectly chosen mirror. The key is getting your home staged by a professional. Home stagers will evaluate the current condition and belongings in your house and determine what elements might raise the bar. They might recommend you buy or rent some items, or they might just reorganize your knickknacks and bookshelves in a whole new (that is, better) way.
Article from Realtor.com
How to Get A Super Organized Family Closet
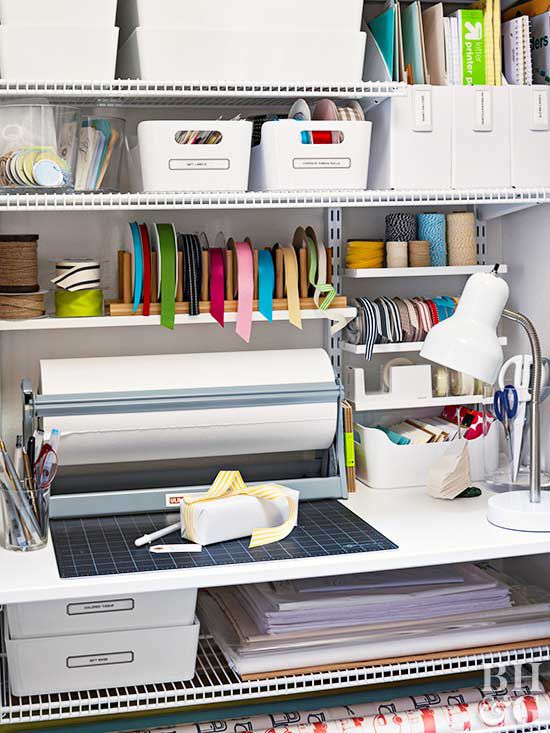
Part craft room, part mini office, part household toolbox—all neat and organized. This can-do supply closet puts all the little things at your fingertips.
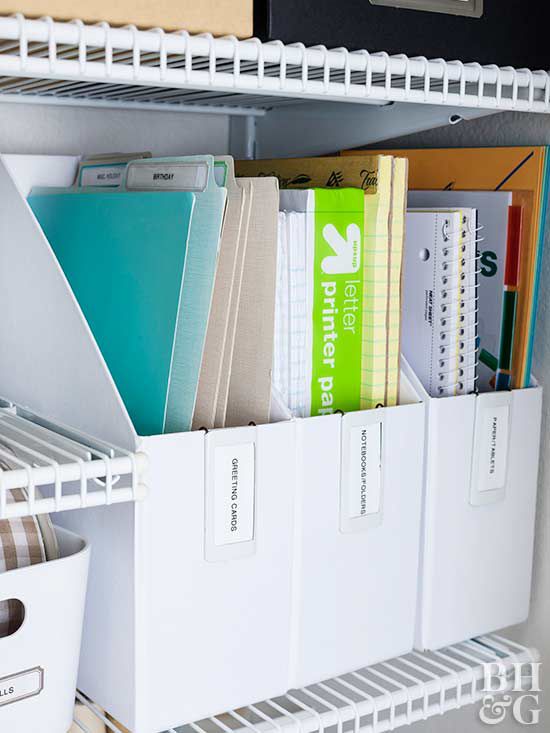
Storage closets have a way of getting cluttered quickly, but they don’t have to. Take action—and inspiration! This closet design tames the mess and works triple duty, serving as a craft area, an office, and a tool bench. The organization secrets are timeless: Add extra shelves, buy storage bins, and label everything, so no matter who shares the space, it’s clear where things go.
Space Planning
Gather what you want to store and sort into categories, like with like (i.e. school and office supplies belong together). Put what you use most often between waist and eye level and/or on the back of the door. In this closet, boxes of printed photos sit high out of the way, school papers and games down low for easy kid access.
Smart Shelves
Adjustable DIY wire closet systems let you match shelf heights and depths to contents for maximum efficiency. Notice the top shelf isn’t as long as the rest, leaving room to the right for tall magazine files on the shelf below. Expect to spend about $350 to retrofit a standard 30-inch-wide closet with adjustable wire shelves, such as Container Store’s Elfa system. An extra-deep solid shelf installed at counter height makes a small workstation inside the closet.
Orderly Containers
Straight-sided, lidded boxes work best. We used only three main kinds of boxes: heavy-duty cardboard file and photo boxes, white plastic boxes, and white canvas bins. They stack well, and the repetition looks tidy. Label each box.
Wrapping Workstation
Shallow shelves above and beside the paper roll put tape and ribbons (filed in a plate rack—genius) within reach but out of the way. Larger shelves below hold tissue paper and gift-wrap rolls. If your closet doesn’t have an outlet for a lamp, consider adding battery operated puck lights.
Back-of-Door Storage
Hanging shoe pouches are ideal for storing smalls. Fabric pouches look neat but need labels to keep things orderly. If you don’t want to add labels, buy a clear plastic shoe pouch, so you see where things go at a glance.
File Boxes
A sturdy file box replaces a bulky cabinet and stores keeper kid art and school papers from the current year. It sits on the floor of the closet so it slides in and out of place without lifting. Place adhesive felt pads on the bottom of the box to prevent floor scratches.
Article from BHG.com

7 Tax Benefits of Owning a Home: A Complete Guide for Filing Now and Next Year
What are the tax benefits of owning a home? Homeowners might be wondering this right around now as they prepare to file their taxes. Especially since the new Tax Cuts and Jobs Act—the most substantial overhaul to the U.S. tax code in more than 30 years—went into effect on Jan. 1, 2018. You might even be wondering how the new plan affects the tax perks of homeownership.
Well, look no further than this complete guide to all the tax benefits of owning a home. We break down exactly what’s changed, and all the tax breaks homeowners should be aware of when they file their 2018 taxes.
Read on to make sure you aren’t missing anything that could save you money!
Tax break 1: Mortgage interest
What changed: In the past, one of the most lucrative tax breaks for homeowners was the deduction for mortgage interest. The new tax code didn’t eliminate the deduction, but it did change substantially. The new tax bill allows homeowners with a mortgage that went into effect before Dec. 15, 2017, to continue to deduct interest on loans up to $1 million.
“However, for acquisition debt incurred after Dec. 15, 2017, the tax reform only allows the homeowner to deduct the interest on the first $750,000,” says Lee Reams Sr., chief content officer of TaxBuzz.
Why it’s still important: The ability to deduct the interest on a mortgage continues to be a big benefit of owning a home. And the more recent your mortgage, the greater your tax savings.
“The way mortgage payments are amortized, the first ones are almost all interest,” says Wendy Connick, owner of Connick Financial Solutions. (See how your loan amortizes and how much you’re paying in interest with this mortgage calculator.)
Note that the mortgage interest deduction is an itemized deduction. This means that for it to work in your favor, all of your itemized deductions (there are more below) need to be greater than the new standard deduction, which the Tax Cuts and Jobs Act nearly doubled to $24,400 for a married couple (it used to be $12,700). For individuals the deduction is $12,200, and it’s $18,350 for heads of household.
As a result, only about 5% of taxpayers will itemize deductions this filing season, says Connick. “In the past it was more like 30%.”
For some homeowners, itemizing simply may not be worth it this year. So when would itemizing work in your favor? As one example, if you’re a married couple who paid $20,000 in mortgage interest and $6,000 in state and local taxes, you would exceed the standard deduction and be able to reduce your taxable income by an additional $2,000 by itemizing.
Tax break 2: Property taxes
What changed: In the past, property taxes in their entirety had always been deductible. (Here’s more info on how to calculate property taxes.) But now, this deduction is capped at $10,000 for those married filing jointly no matter how high the taxes are.
Why it’s still important: Taxpayers can still take one $10,000 deduction, says Brian Ashcraft, director of compliance at Liberty Tax Service. Just note that this year, property taxes are on that itemized list of all of your deductions that must add up to more than the standard deduction ($24,000 for a married couple) to be worth your while. And remember that if you have a mortgage, your taxes are built into your monthly payment.
Tax break 3: Private mortgage insurance
What changed: If you put less than 20% down on your home, odds are you’re paying private mortgage insurance, or PMI, which costs from 0.3% to 1.15% of your home loan. Good news! The new tax bill extended the ability to deduct the interest on this insurance, a deduction that was set to expire, says Connick.
Why it’s still important: The PMI interest deduction is also an itemized deduction. But if you can take it, it might help push you over the $24,000 standard deduction. And here’s how much you’ll save: If you make $100,000 and put down 5% on a $200,000 house, you’ll pay about $1,500 in annual PMI premiums and thus cut your taxable income by $1,500. Nice!
Tax break 4: Energy efficiency upgrades
What changed: Nada. The Residential Energy Efficient Property Credit was a tax incentive for installing alternative energy upgrades in a home. Most of these tax credits expired after December 2016; however, two credits are still around. The credits for solar electric and solar water heating equipment are available through Dec. 31, 2021, says Josh Zimmelman, owner of Westwood Tax & Consulting, a New York–based accounting firm.
Why it’s still important: You can still save a tidy sum on your solar energy. And—bonus!—this is a credit, so no worrying about itemizing here. However, the percentage of the credit varies based on the date of installation. For equipment installed between January 1, 2017, and December 31, 2019, 30% of the expenditures are eligible for the credit. That goes down to 26% for installation between Jan. 1 and Dec. 31, 2020, and then to 22% for installation between Jan. 1 and Dec. 31, 2021.
Tax break 5: A home office
What changed: In the good ol’ days of 2017, if you worked from home at all, your office space and expenses could be deducted. Now this deduction is gone completely for employees who have an office to go to but work from home occasionally.
Why it’s still important: Good news for all self-employed people whose home office is the main place they work, you can still take a $5-per-square-foot deduction for up to 300 square feet of office space, which amounts to a maximum deduction of $1,500. Understand, however, that there are strict rules on what constitutes a dedicated, fully deductible home office space.
Tax break 6: Home improvements to age in place
What changed: Not much, except that for this filing season, these home improvements will need to exceed 7.5% of your adjusted gross income. So if you make $60,000, this deduction kicks in only on money spent over $4,500.
Why it’s still important: The cost of these improvements can result in a nice tax break for many older homeowners who plan to age in place and add renovations such as wheelchair ramps or grab bars in slippery bathrooms. Deductible improvements might also include widening doorways, lowering cabinets or electrical fixtures, and adding stair lifts. Caveat: You’ll need a letter from your doctor to prove these changes were medically necessary.
Tax break 7: Interest on a home equity line of credit
What changed: In the past, people used these loans to do all sorts of things: pay for college, throw a wedding, or make improvements to their home. And they could legally deduct the interest. Not anymore, even if you took out the loan before the new tax plan.
Now if you have a home equity line of credit, or HELOC, the interest you pay on that loan is deductible only if that loan is used specifically to “buy, build, or improve a property,” according to the IRS.
Why it’s still important: You’ll still save cash if your home’s crying out for a kitchen overhaul or half-bath. Major note: You can deduct only up to the $750,000 cap, and this is for the amount you pay in interest on your HELOC and mortgage combined.
Article from Realtor.com
Tips for Homebuyers: Make the Most of Your Time and Resources
Let’s face it – most homebuyers have limited time and resources at their disposal. As such, it is crucial for buyers to do everything possible to optimize their time and resources throughout the property buying journey. Because if a buyer maximizes his or her time and resources, this individual can boost the likelihood of enjoying a successful homebuying experience.

Now, let’s take a look at three tips to help a homebuyer get the most out of his or her time and resources.
1. Craft a Homebuying Strategy
If you know you want to buy a home, you should develop a property buying strategy. That way, you can map out the steps you’ll need to take to find and acquire your dream residence.
A typical homebuying strategy should account for your budget, timeline and other property buying factors. If you analyze these factors, you could streamline your quest to discover your ideal house.
2. Narrow Your Home Search
You plan to buy a house as soon as possible, but you still have no idea where you want to reside. Fortunately, if you hone your house search to a few cities and towns, you may be able to quickly and effortlessly find a great home in an area you can enjoy for years to come.
As you get ready to start a home search, consider your long-term plans. For instance, if your ultimate goal is to work in a big city, you may want to focus on houses in or near major metros. Or, if you want to raise a family, you may want to search for residences near outstanding schools and parks.
In addition, perform lots of research into various cities and towns. If you conduct plenty of research, you can find out whether certain areas match or exceed your expectations and tailor your house search accordingly.
3. Collaborate with a Real Estate Agent
A real estate agent is a property buying expert who understands what it takes to find a terrific residence at a budget-friendly price. Thus, if you hire a real estate agent today, you can get the help you need to reap the benefits of a seamless home search.
Oftentimes, a real estate agent will meet with you, learn about your property buying goals and craft a personalized homebuying strategy. He or she also will respond to your homebuying concerns and questions throughout the property buying journey. By doing so, a real estate agent ensures you can receive expert support as you try to find your dream house.
A real estate agent will make it simple to search for houses that fall within your budget and correspond to your homebuying criteria too. Plus, if you want homebuying recommendations or suggestions, a real estate agent is happy to provide them.
Want to enjoy a fast, successful homebuying experience? Take advantage of the aforementioned tips, and you should have no trouble making the most of your time and resources as you search for your ideal house.
By Laura A. Sanchez

8 Lesser Known Fees That Factor Into the True Cost of Home Buying
Application fees, appraisal, inspection … a lot of little costs start to add up. Here’s how to be prepared.
With your focus on building your down payment fund and figuring out what your mortgage payment will be, it’s easy to overlook some of the smaller fees that come along with a home purchase. Here are eight and what they could cost you.
#1 Home Inspection
A home inspection helps protect you from purchasing a home that could be a lemon. So you don’t want to forgo it Inspectors will look for signs of structural issues, mold, and leaks; assess the condition of the roof, gutters, water heater, heating and cooling system; and more. Inspections cost between $300 and $500, and whether or not you end up purchasing the property, you still need to pay this fee.
REALTOR® Tip Your inspector isn’t required to be an expert in everything. If you suspect termites, asbestos, and foundational issues, for instance, you’ll need to hire a specialist.
#2 Appraisal Fee
This appraisal report goes to your lender to assure it that the property is worth what you’re paying for it. This report worked in our favor a couple of years ago when our home came back appraised for $10,000 less than our bid; the sellers had to reduce their asking price in order to move forward. An appraisal can take about 2 hours and costs between $200 and $425.
REALTOR® Tip If you’re selling, review the appraisal thoroughly for any oddball numbers or descriptions that could affect the value of your home.
#3 Application Fees
Before ever approving you for a loan, the lender is going to run your credit report and charge you an application fee, often lumping the credit report fee in with the application fee. This can run $75 to $300. Be sure to ask for a breakdown of the application fees to understand all costs.
#4 Title Services
These fees cover a title search of the public records for the property you’re buying, notary fees for the person witnessing your signature on documents, government filing fees, and more. These can cost between $150 and $400, and it’s important to get a line item for each cost.
#5 Lender’s Origination Fees
Your lender will charge you this upfront free for making the mortgage loan. This includes processing the loan application, underwriting the loan (researching whether to approve you), and funding the loan. These fees are quoted as a percentage of the total loan you’re taking out and generally range between 0.5 to 1.5%.
#6 Survey Costs
This report ($150 to $400) confirms the property’s boundaries, outlining its major features and dimensions.
#7 Private Mortgage Insurance (PMI)
When you put down less than 20% on your new home, the lender requires that you purchase a PMI, which is a policy that protects the lender from losing money if you end up in foreclosure. So PMI is a policy that you have to buy to protect the lender from you. PMI rates can vary from 0.3% to 1.5% of your original loan amount annually.
Money Tip: Your lender must cancel PMI once you reach 78% of your loan-to-value ratio or you have 22% equity. But you can petition to cancel early when your LTV hits 80%.
#8 Tax Service Fee
This is the cost (about $50) to ensure that all property tax payments are up to date and that the payments you make are appropriately credited to the right home.
Always ask questions when it comes to understanding the fees you’re paying. If possible, print out documents and go through them with a highlighter to indicate any areas you have concerns about. Discuss them with your lender or real estate agent and determine if you can negotiate any of them down.
Don’t be afraid to price shop to ensure you’re getting the best value. Just because you’re spending hundreds of thousands on a home doesn’t mean you should be comfortable throwing thousands of dollars at fees.
Article from HouseLogic.com


